Switching Branches
Goals
By the end of this lesson you should be able to
- Use the
git switchcommand to switch between branches in a Git repository
The Switch Command
The git switch command can be used to switch between branches.
$ git switch <branch_name>
NOTE: If you read Git documentation on the internet you will encounter many sites that use thegit checkoutcommand to switch branches. This command had become overloaded with functionality so the Git developers have recently split its functionality into two new commands,git switchandgit restore. You already encounterdgit restorein the Undoing Changes lesson. This lesson deals withgit switch.
What does it mean to switch branches? Two main things happen:
- The
HEADpointer now points to the branch that was switched to - Git sets the contents of all files in the working tree and index to be the same as those of the commit pointed to by the branch that was switched to.
Let's see this in action. Right now, your commit history looks something like this:
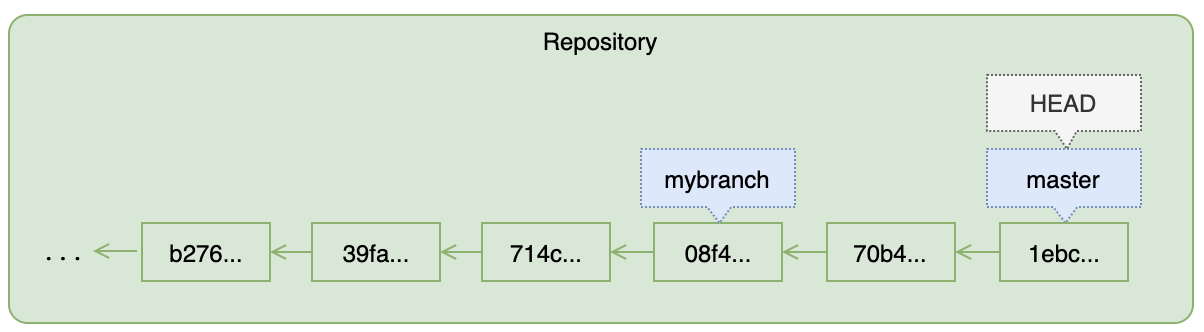 Figure: Initial Branch Configuration
After switching to the mybranch branch it will look like the figure below, and your working tree contents will have chnaged.
 Figure: Branch Configuration After Switch
Try it yourself:
Switch to the
mybranchbranch, and display the log$ git switch mybranch Switched to branch 'mybranch' $ git branch master * mybranchNotice that
mybranchis now the active branch as indicated by the*in the output of thegit branchcommand.Examine the contents of the
git-cheat-sheet.txtfile. What happened to the lines you added in the previous lesson?!
Git has set the contents of all the files in your working tree to be the same as those of the commit pointed to by the branch you switched to!
This aspect of branches can seem unsettling when you first encounter it. Git beginners sometimes worry about losing work they have done by switching branches, but their worries are unfounded. All the information is still in the repository; Git has simply updated the contents of your working tree.
Let's confirm that by switching back to the master branch:
Switch back to the
masterbranch$ git switch master Switched to branch 'master' $ git branch * master mybranchConfirm that
git-cheat-sheet.txtagain contains the new lines from the previous lesson.
Enlightenment is Near!
Once you get comfortable with this aspect of Git, you are near to Git enlightenment! Now, when you want to try something experimental in your code you should think nothing of creating a new branch in which to try things out. If things don't go well, you can just delete the branch and resume with whatever state your code was in on the master branch. And what if your experiments do work? You will learn in the next few lessons how to merge changes from one branch into another.
Before moving on, though, let's take a look at the log output as we switch branches…